

Damp walls internally are a silent, growing issue that affects both the structure of your home and your health. Many homeowners struggle with peeling paint, musty odours, mould patches, and recurring moisture. According to UK housing data, around 5% of homes in England (over 1.4 million properties) had damp problems in 2024-2025.
Moreover, exposure to damp and mould in the UK is strongly linked to respiratory illnesses and wider health risks. Around 2 million people in England live in homes with significant damp or mould, resulting in nearly 40,000 NHS hospital admissions.
To save your walls and health, this blog not only explains how to treat damp walls internally fast but also helps you understand the underlying reasons behind dampness, so you can fix the problem effectively from the root.
Key Takeaways
- Damp originates from condensation, poor ventilation, leaks, and rising moisture, leading to structural damage and persistent mould growth.
- To treat damp walls internally, one should seek professional help or try DIY techniques.
- Damp wall treatment can cost £400 to £7,500+ based on severity.
- Damp 2 Dry Solutions offers rising damp repair, condensation, penetrating damp, and structural damp services.
What Causes Damp Walls?
Damp internal walls are usually caused by issues like poor ventilation, leaking pipes, rising damp, or condensation from daily activities such as cooking and drying clothes indoors.
Over time, this moisture seeps into plaster and paint, weakening surfaces and creating the perfect environment for mould growth.
Given that, here is a detailed explanation of the causes of damp walls:
1. Moisture from Daily Activities
This issue is often seen in kitchens and bathrooms. It occurs when warm, moisture-filled air meets cold wall surfaces, forming water droplets. Activities like cooking, showering, and drying clothes indoors can cause persistent damp internal walls.
2. Poor Ventilation & Airflow
Lack of proper ventilation traps moisture inside the home, preventing it from escaping. Blocked airflow behind furniture or in closed rooms further accelerates damp formation and mould growth.
3. Leaking Pipes & Internal Plumbing Issues
Hidden leaks from pipes inside walls, ceilings, or under floors are a major cause of internal damp. Even small leaks can continuously introduce moisture into wall structures.
4. Rising Damp from Ground Moisture
Rising damp occurs when groundwater travels upward through porous building materials like bricks and plaster via capillary action. It typically affects lower walls and leaves visible “tide marks,” salt deposits, and peeling finishes.
5. Structural Defects & Poor Maintenance
Issues like damaged roofs, clogged gutters, faulty drainage, or cracks in walls allow water to seep into the building envelope. Without regular maintenance, these problems worsen and lead to chronic damp conditions.
Identifying Different Types of Damp
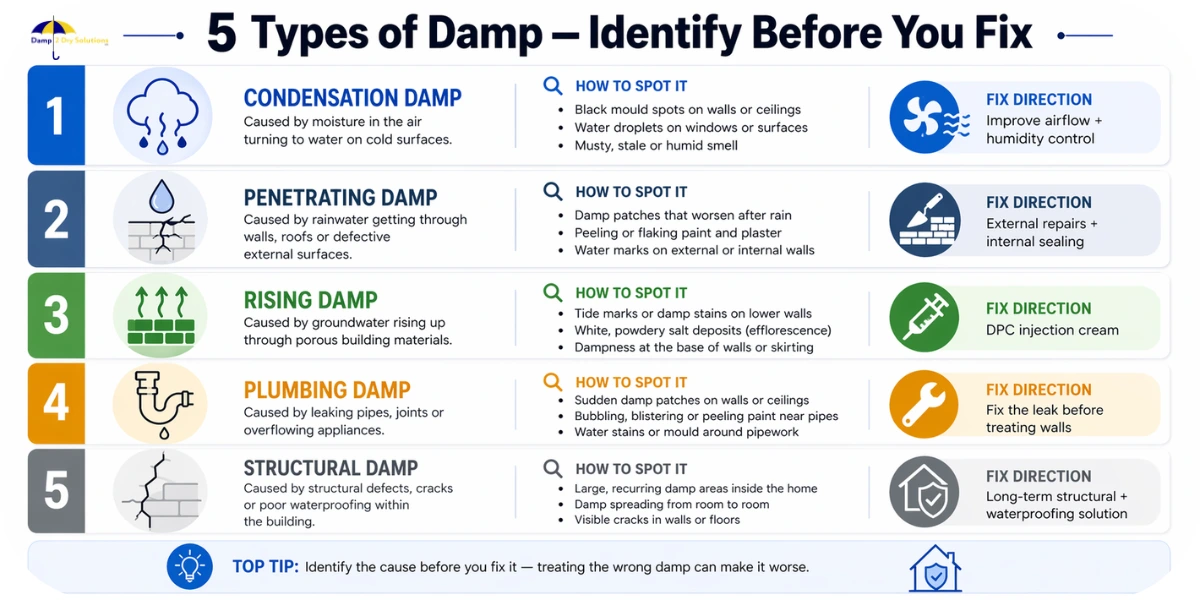
You must identify the type of damp before you actually treat damp walls internally or externally. Each type has a different cause, appearance, and solution.
Misjudging the issue often leads to temporary fixes instead of long-term results. Given that, below are the most common types and how to recognise them:
1. Condensation Damp
Condensation damp occurs when warm, moisture-laden air comes into contact with cold wall surfaces, forming water droplets. It is most common in bathrooms, kitchens, and poorly ventilated rooms.
How to identify?
- Constant water droplets on walls or windows
- Black mould spots (especially in corners or behind furniture)
- Musty smell and recurring damp patches on walls
This type requires improved airflow and humidity control as part of effective damp wall treatment.
2. Penetrating Damp
Penetrating damp is caused by water entering the property from external sources such as damaged roofs, cracked walls, or faulty gutters. It can affect any level of the building.
How to identify?
- Damp patches on walls that worsen during rainfall
- Peeling paint or plaster damage with damp stains on walls or ceilings
For treating damp in walls, this type often needs both external repairs and internal sealing.
3. Rising Damp
Rising damp occurs when groundwater travels upward through porous materials like bricks and plaster due to capillary action. It mainly affects ground-floor walls.
How to identify?
- Damp patches starting from the bottom of the walls
- “Tide marks” or horizontal staining
- White salt deposits (efflorescence) with peeling paint
4. Leaking or Plumbing-Related Damp
This type of damp is caused by internal issues such as leaking pipes, faulty plumbing, or damaged fixtures. It can occur anywhere within the property.
How to identify?
- Sudden damp patches without weather changes
- Water stains, bubbling paint, or soft plaster near pipes, bathrooms, or kitchens
Before you treat damp walls internally, fixing the leak is essential to prevent recurring damage.
5. Structural Damp
Structural damp results from construction defects such as poor waterproofing, cracks in walls, or inadequate drainage systems. It often leads to persistent and widespread damp problems.
How to identify?
- Large, recurring damp areas on walls with cracks
- Damp issues that transfer from one room to another
This type requires long-term structural solutions along with internal damp treatment.
What causes condensation dampness on internal walls?
Condensation dampness is one of the most common and often misunderstood causes of moisture on internal walls. It occurs when warm, moisture-laden air comes into contact with colder wall surfaces.
You may notice small damp spots, water droplets, or black mould forming on walls. These visible signs indicate that excess moisture is not escaping your home and is instead settling on surfaces.
This type of damp is not just a surface-level issue. Over time, it can lead to peeling paint, damaged plaster, musty odours, and even health concerns.
If ignored, condensation damp can worsen gradually, spreading across larger areas and creating an environment ideal for mould growth. That is why strict measures like addressing ventilation, controlling indoor humidity, and maintaining consistent temperatures should be taken for prevention.
What Should I Do If I Have Damp Walls: 5 Quick Tips
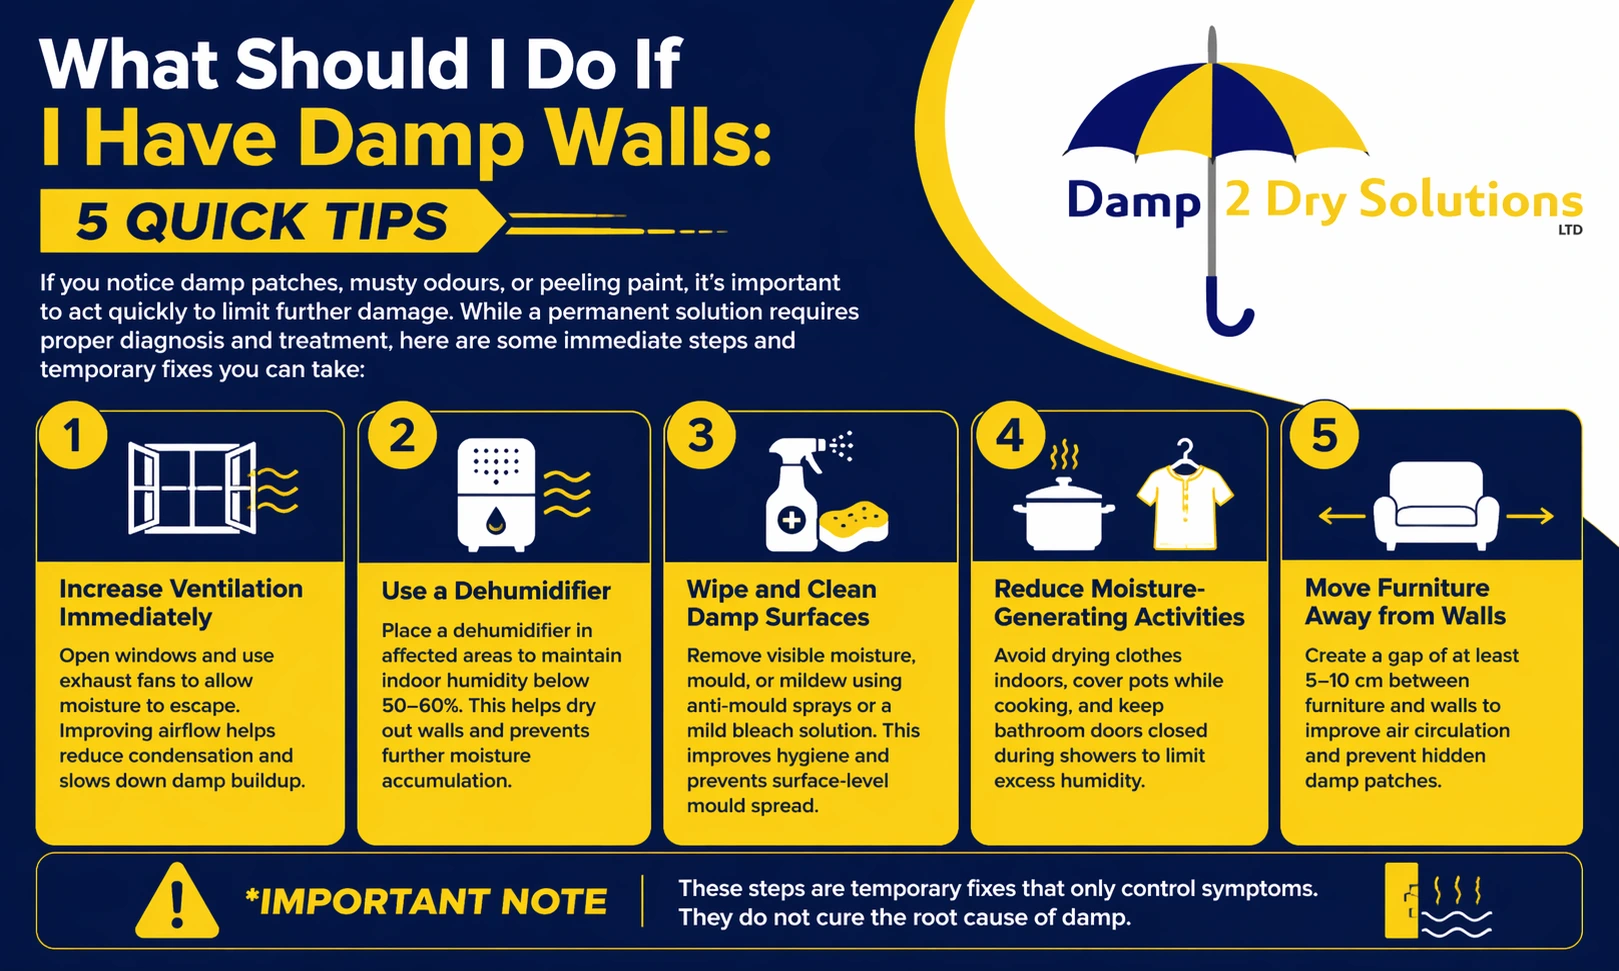
If you notice damp patches, musty odours, or peeling paint, it’s important to act quickly to limit further damage. While a permanent solution requires proper diagnosis and treatment, here are some immediate steps and temporary fixes you can take:
1. Increase Ventilation Immediately
Open windows and use exhaust fans to allow moisture to escape. Improving airflow helps reduce condensation and slows down damp buildup.
2. Use a Dehumidifier
Place a dehumidifier in affected areas to maintain indoor humidity below 50-60%. This helps dry out walls and prevents further moisture accumulation.
3. Wipe and Clean Damp Surfaces
Remove visible moisture, mould, or mildew using anti-mould sprays or a mild bleach solution. This improves hygiene and prevents surface-level mould spread.
4. Reduce Moisture-Generating Activities
Avoid drying clothes indoors, cover pots while cooking, and keep bathroom doors closed during showers to limit excess humidity.
5. Move Furniture Away from Walls
Create a gap of at least 5-10 cm between furniture and walls to improve air circulation and prevent hidden damp patches.
*Important Note
These steps are temporary fixes that only control symptoms. They do not cure the root cause of damp.
How To Treat Damp Walls Internally DIY?
These methods focus on hands-on treatments and easily available products to manage damp walls at home. They are suitable for mild to moderate issues and are often used as internal damp treatment methods before opting for professional solutions.
-
Apply Anti-Mould & Anti-Condensation Paints
Use specialised paints like Anti-Mould Paint or Zinsser Perma-White that resist moisture and prevent fungal growth. These coatings create a protective layer on walls and are effective in moisture-prone areas like kitchens and bathrooms.
-
Use Damp Seal or Stain-Blocking Primers
Apply a damp seal primer such as Thompson’s Damp Seal or Zinsser Watertite before repainting. These products block moisture stains and are considered among the best treatments for damp walls.
-
DIY Waterproof Coating
Apply a liquid waterproofing solution or masonry waterproofer available at hardware stores. These coatings are basic internal damp treatment methods that form a barrier that minimises minor water penetration.
-
Use Baking Soda or Charcoal for Moisture Control
Natural remedies like baking soda bowls or activated charcoal can absorb excess moisture as part of the overall damp walls treatment. However, avoid this with kids or pets at home.
-
Seal Minor Cracks & Gaps
Use ready-to-use wall fillers or silicone sealants to close small cracks around windows, pipes, or wall joints. This prevents minor moisture ingress and strengthens the results when you treat damp walls internally.
Best Treatments For Damp Walls Professionally
If your DIY methods have failed and you are looking for how to fix damp walls permanently, then you should call out professional help.
They usually do the following:
-
Damp Proof Injection Cream (Rising Damp Control)
A professional usually injects a silane/siloxane-based damp-proof cream to form a continuous horizontal barrier, restricting capillary moisture rise through masonry. It is used where an existing damp-proof course (DPC) is missing or has failed.
-
Salt-Resistant Replastering System
Remove all contaminated plaster up to at least 1 meter above the highest damp line or 300mm beyond visible damage. They then apply a sand-cement render with waterproofing admixture, followed by a skim coat. This prevents hygroscopic salts from attracting moisture back into the wall surface for long-term damp wall treatment.
-
Cementitious Waterproof Coating
Usually, two coats of cement-based waterproof slurry are applied with a minimum combined thickness of 2-3mm. Provides an internal barrier against moisture ingress from penetrating damp and is commonly used to treat damp walls internally in controlled environments.
-
Controlled Drying & Dehumidification
Refrigerant or desiccant dehumidifiers maintain indoor humidity at 50-55% RH. Combine with air circulation to accelerate evaporation from wall surfaces.
-
Mechanical Ventilation Installation
Professionals install extractor systems with airflow rates of 15-30 L/s (bathrooms) and 60 L/s (kitchens). This ensures continuous or humidity-controlled operation.
-
Thermal Lining / Insulated Plasterboard
Fix thermal plasterboards or insulated lining systems to cold walls using adhesive dabs or mechanical fixings. This raises the wall surface temperature above the dew point, preventing condensation formation.
How To Treat Damp Walls Externally?
External treatment focuses on stopping water from entering the building. Addressing these issues early reduces the risk of damp internal walls.
1.Repair External Defects
Fix cracked brickwork, damaged rendering, and faulty window seals to prevent water penetration. Even minor cracks can allow rainwater to seep deep into wall structures, so sealing them with appropriate masonry fillers or repointing mortar is essential for long-term durability.
2.Maintain Roofs and Gutters
Clean and repair gutters and downpipes to ensure proper water drainage away from walls. Poor drainage is a major cause of damp, and regular maintenance prevents overflow that can saturate walls and foundations over time.
3.Adjust Ground Levels
Ensure the ground level is at least 150mm below the damp-proof course (DPC) to prevent moisture from rising into walls. Raised soil, paving, or debris near walls can bridge the DPC, making treating damp in walls ineffective.
4.Improve Drainage Around Property
Install proper drainage systems to divert water away from the foundation and reduce moisture exposure. Solutions like French drains or slope grading can prevent water accumulation.
How much does it cost to damp-proof an internal wall?
After discussing how to treat damp walls internally, let’s look at the cost of treating damp in walls.
In the UK, the cost of treating damp in walls in 2026 typically ranges from £150 to £300 for minor damp/mould repairs. Damp in the living room or kitchen wall can cost between £1,800 and £2,300.
Large damp patches usually cost about £1,400 to £1,800. Handling severe structural damp issues, on the other hand, can cost between £6,000 and £8,000.
So, you can assume that the average damp proofing cost in the UK lies between £500 and £2,000.
Source: Damp Proofing Cost Guide for 2026 – MyBuilder
Dealing With Damp Internal Walls With a Damp Expert
Dealing with damp internal walls often requires more than surface-level fixes. When the problem persists or worsens, consulting a damp expert ensures accurate diagnosis and long-term solutions.
In addition, many questions may be bubbling into your mind. What are the initiatives that must be taken by an individual to handle the problem of damp internal walls? Don’t let your brain be confused in finding a reliable platform to effectively deal with this issue smoothly.
Damp2 Dry Solutions can help you resolve this issue by offering guidance from experienced professionals in the field. Contact our damp specialist at Damp 2 Dry Solutions to assess the root causes and remedies for excessive moisture in your structure by completing the required form.
Also Read: How to Choose the Best Basement Dehumidifier?
The Bottom Line
If you’re searching for experienced and professional damp contractors, don’t look any further than Damp 2 Dry Solutions. We provide treatments for rising damp, condensation control, woodworm eradication, and timber treatments throughout Cheshire, Manchester, Lancashire, Liverpool, Merseyside, Sheffield, Stoke-on-Trent, and all surrounding areas.
Get in touch, we will be happy to offer you our full service, starting with a No-Obligation Damp Survey to assess your problems and recommend solutions.
FAQs
1. How do you fix a damp internal wall from the inside?
To treat a damp wall internally, identify the moisture source, repair leaks, dry the wall completely, removing damaged plaster, and apply damp-proof coatings or membranes. Improving ventilation and humidity control is essential to prevent recurrence and ensure long-term effectiveness.
2.What is the permanent solution for a damp wall?
A permanent solution requires addressing the root cause, such as installing a damp-proof course (DPC), repairing structural defects, improving drainage, and applying waterproof systems. Long-term results depend on combining external repairs, internal treatments, and moisture control strategies rather than temporary surface fixes.
3.How much does it cost to treat damp in internal walls?
In 2026, treating damp in internal walls typically costs between £500 and £2,000. Full damp-proofing or DPC installation ranges from £6,000 to £8,000, depending on severity, wall area, and required structural or waterproofing treatments.
4.How to prevent dampness in walls?
Prevent dampness by maintaining proper ventilation, controlling indoor humidity below 60%, fixing leaks promptly, ensuring effective drainage, and insulating walls to avoid condensation. Regular maintenance of roofs, gutters, and external surfaces also helps prevent moisture buildup and long-term damp issues.
5.Can painting fix damp internal walls?
Painting alone cannot fix damp internal walls. Damp-proof or anti-mould paints can temporarily hide stains and resist moisture, but they do not address underlying causes. Without fixing leaks, ventilation, or structural issues, dampness will eventually reappear through the paint surface.
