Key Takeaways!
- Not all low-level damp is caused by a failed damp proof course. Bridging, condensation, and leaks are frequently misdiagnosed as DPC failure.
- A visible tide mark combined with salt deposits and deteriorating plaster is a much stronger indicator of rising damp than any single symptom alone.
- Many homeowners spend thousands on unnecessary damp-proofing treatments because the true moisture source was never properly identified.
- Moisture meter readings can be misleading. Professional diagnosis should combine visual inspection, moisture patterns, building history, and external checks.
- Before considering DPC replacement, inspect ground levels, drainage, gutters, and potential bridging defects. The fix may be far simpler and cheaper than expected.
- Failed DPC, bridged DPC, and absent DPC are three different problems. Correctly identifying which one exists is the key to choosing the right repair.
A surveyor takes one look, mentions rising damp, and suddenly you’re staring at a repair quote worth thousands of pounds. Before you commit to expensive work, it’s important to understand the signs of failed damp proof course and whether a failed DPC is really the cause of the problem.
A compromised DPC often develops gradually, making it easy to dismiss early warning signs until the damage becomes extensive and expensive to repair.
To avoid costly mistakes, learn the 7 common signs that your damp proof course may have failed, how to distinguish them from other damp problems, and what steps to take next.
What a Damp Proof Course Actually Does?
A damp proof course (DPC) is a horizontal barrier installed near the base of a wall to stop groundwater from rising through masonry by capillary action. Its primary purpose is to keep moisture from travelling upward into internal walls, plaster, and finishes.
Given that, here is how it stops moisture from spreading:
- Prevents rising damp: Blocks moisture from moving up through bricks, mortar, and masonry.
- Protects internal finishes: Helps prevent peeling paint, damaged plaster, salt deposits, and other moisture-related defects.
- Varies by property age: Victorian and Edwardian homes commonly used slate, engineering bricks, or bitumen-based materials, while modern buildings typically use plastic or polyethylene membranes.
- Designed for long-term protection: Physical DPCs can remain effective for decades when properly installed and maintained.
- Treatment lifespan varies: Some chemical damp-proofing treatments are generally expected to last around 20–25 years, depending on the product, installation quality, and property conditions.
What Is Damp Proof Course Failure?
Damp proof course failure occurs when the barrier designed to stop ground moisture from rising through walls can no longer prevent water movement.
When this happens, moisture from the ground begins travelling upward through the wall structure, often carrying salts and minerals with it. As the moisture evaporates, these salts are left behind within the masonry and plaster. This causes issues such as white salt deposits, bubbling paint, peeling wallpaper, and deteriorating plaster.
In advanced damp proof course failure, prolonged moisture exposure can contribute to timber decay and other structural problems.
However, a failed DPC is not always the reason damp appears on lower walls. Moisture can also bypass an otherwise functioning damp proof course through a process known as bridging.
How can I tell if my DPC is broken?
Work through these checks:
- Look for: You may notice horizontal tide marks, white salt deposits, deteriorating plaster, and damaged skirting along the same low-level band.
- Locate the DPC from outside: On many properties, you can spot the physical damp proof course in the external wall (a thin line of slate, bitumen, or plastic running through the mortar above ground level.
- Compare the DPC line to the damp inside: If moisture is climbing above the level of the visible DPC internally, that’s a stronger indicator of a failed or bridged damp proof course than any indoor sign on its own.
- Check whether a DPC exists at all: If you can’t identify a DPC line anywhere, the property may never have had one installed (common in older period homes), which points to an absent DPC rather than a failed one.
The 7 Signs Your DPC Has Failed
If you’re asking, “has my damp proof course failed?”, the following indicators are among the most commonly associated with rising damp and moisture bypassing the property’s damp-proof barrier.
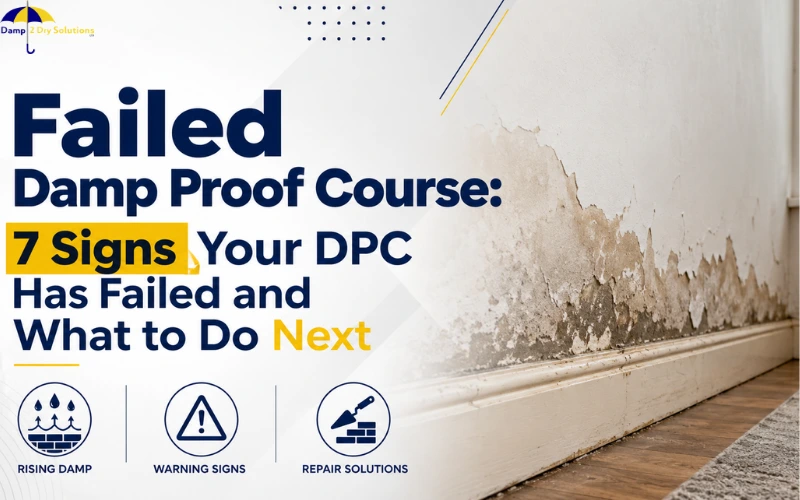
1. A Horizontal Tide Mark 30cm–1m Above Floor Level
A tide mark is often considered one of the most recognisable indicators of rising damp. As groundwater rises through masonry, it carries mineral salts that remain behind when the moisture evaporates. Over time, this creates a visible horizontal stain, usually between 30cm and 1m above floor level.
Tide marks generally follow a consistent line across the wall. The height varies depending on evaporation rates, wall construction, and the amount of moisture entering the masonry.
Where to look: Ground-floor walls, chimney breasts, hallways, and external-facing walls.
2. Peeling, Bubbling, or Flaking Paint and Wallpaper Near Skirting
Decorative finishes are often among the first areas to show damage. Moisture trapped within plaster weakens the bond between the wall surface and paint or wallpaper, causing blistering, bubbling, and peeling.
If damage continues to return in the same area, it may indicate moisture movement from below rather than a surface-level defect.
Where to look: Around skirting boards, behind furniture, and along the lower metre of internal walls.
3. White Powdery Salt Deposits on Walls
White crystalline deposits, known as efflorescence, form when moisture evaporates and leaves soluble salts behind.
In severe cases, hygroscopic salts attract moisture from the air, causing walls to remain damp and accelerating plaster deterioration.
Where to look: On plaster surfaces, brickwork, and areas close to tide marks.
4. Persistent Musty Damp Odour
A musty smell is often one of the earliest signs noticed by occupants. Moisture trapped within masonry, plaster, and timber creates conditions that support microbial growth and stagnant air.
Even when walls appear visually dry, a persistent earthy or damp smell can indicate that moisture is still present within the building fabric.
Where to look: Ground-floor rooms, cupboards, understairs storage areas, and enclosed spaces against external walls.
5. Crumbling, Soft, or Hollow-Sounding Plaster
As moisture repeatedly enters plaster, it breaks down the material’s structure and weakens its adhesion to the masonry beneath. Affected plaster may feel soft, crumble easily, or produce a hollow sound when tapped.
Over time, salt contamination can further accelerate deterioration, often requiring plaster replacement after the underlying moisture issue has been resolved.
Where to look: Lower wall sections, especially beneath visible tide marks or areas of salt contamination.
6. Damaged, Stained, or Rotting Skirting Boards and Low Timbers
Timber in direct contact with damp masonry can absorb moisture over prolonged periods. This often causes staining, swelling, warping, paint failure, and in severe cases, fungal decay.
While rising damp itself does not directly cause all forms of timber rot, persistent moisture creates favourable conditions for deterioration if left untreated.
Where to look: Skirting boards, door frames, fitted cupboards, and timber flooring edges adjoining external walls.
7. Black Mould Patches Low on the Wall
Although black mould is most commonly associated with condensation, it can also develop where rising damp increases surface moisture levels and humidity. Mould growth near floor level may indicate that walls are retaining moisture over extended periods.
Where to look: Behind furniture, in corners with poor airflow, around skirting boards, and on lower wall surfaces.
Important Note:
A single symptom does not confirm that the damp proof course is not working. Several of these signs appear together (tide marks, salt deposits, plaster deterioration, and low-level timber damage), and it becomes much more likely that moisture is bypassing or penetrating the property’s damp-proof barrier. A professional survey is often required to determine whether the issue is a genuine DPC failure.
Damp Problems That Can Mimic DPC Failure
Several forms of damp produce signs similar to those associated with rising damp:
- Condensation: Often caused by poor ventilation, high indoor humidity, and cold surfaces. It commonly results in mould growth, damp patches, and peeling decoration, particularly during colder months.
- Penetrating damp: Water enters through defects such as damaged brickwork, cracked render, faulty pointing, leaking gutters, or defective flashing. Unlike rising damp, it can appear at any height on a wall.
- Plumbing leaks: Hidden leaks from pipes, radiators, bathrooms, or heating systems can introduce moisture into walls and floors, creating localised damp patches that are sometimes mistaken for DPC-related problems.
Why Moisture Meter Readings Can Be Misleading?
Moisture meters are frequently used during damp surveys, but their readings should be interpreted with caution. Most handheld meters measure electrical conductivity rather than moisture directly.
As a result, salts, metal fixings, and other conductive materials within a wall can generate elevated readings even when significant moisture is not present.
For this reason, a single moisture meter reading should never be treated as definitive proof of rising damp or DPC failure.
Professional assessments typically combine visual inspection, building history, moisture profiling, and investigation of potential moisture sources before reaching a conclusion.
Failed vs. Bridged vs. Absent: Three Different Problems, Three Different Fixes
Misidentifying the source of moisture can lead to unnecessary treatments, wasted expenditure, and recurring damp problems. Understanding the distinction is essential before deciding on any repair work.
| Issue | What It Means | Common Causes | Typical Clues | Recommended Fix |
| Failed DPC | The existing damp proof course has deteriorated or lost its ability to prevent capillary moisture movement. | Age-related deterioration, damaged membrane, ineffective historic chemical treatment, poor installation. | Multiple signs of failed damp proof course, including tide marks, salt contamination, deteriorating plaster, and recurring damp despite correct external levels. | Repair or replace the DPC, often through a suitable remedial damp-proofing system. |
| Bridged DPC | The DPC remains intact, but moisture bypasses it through an alternative route. | Raised external ground levels, cavity wall debris, external render, and internal plaster extending below the DPC. | Damp appears despite an otherwise functional DPC. Moisture often corresponds with obvious bridging points rather than widespread DPC failure. | Remove the bridge by lowering ground levels, clearing cavities, or correcting plaster and render details. |
| Absent DPC | No damp proof course was ever installed within the original construction. | Common in older properties built before damp-proof courses became standard practice. | Persistent low-level damp across affected walls, particularly in period properties where no physical DPC can be identified. | Install a new damp-proofing system designed for the property’s construction and condition. |
What to Do Next: A Homeowner’s Action Plan
If you’ve noticed several signs of failed damp proof course, do this to avoid unnecessary repairs.
1. Check External Ground Levels
Walk around the outside of the property and identify the visible DPC line, if present. Ideally, external ground levels should sit at least 150mm (two brick courses) below the DPC. Raised flower beds, paving, driveways, or accumulated soil can create a bridge that allows moisture to bypass the barrier.
2. Inspect Gutters, Downpipes, and Drainage
Overflowing gutters, leaking downpipes, blocked drains, and poor surface water management can saturate surrounding masonry and mimic rising damp symptoms. Ensure rainwater is being directed away from the building and that drainage systems are functioning properly.
3. Rule Out Condensation First
Check whether moisture appears mainly during colder months, around windows, behind furniture, or in poorly ventilated rooms. Unlike rising damp, condensation typically affects colder surfaces and upper wall areas rather than creating a distinct low-level moisture pattern.
4. Look for Bridging Defects
Before assuming a damp proof course not working, inspect for common bridging problems. External render, internal plaster, cavity wall debris, or raised ground levels can all provide alternative moisture pathways around an otherwise functional DPC.
5. Commission an Independent Damp Survey
If the cause remains unclear, consider hiring a paid surveyor. Independent assessments are generally less influenced by product recommendations and focus on identifying the actual moisture source.
What Should a Proper Damp Diagnosis Include?
A professional damp survey should typically assess:
- Moisture distribution patterns throughout the property
- External ground levels and drainage conditions
- Condition and visibility of the existing DPC
- Internal and external bridging defects
- Ventilation and condensation risks
- Salt contamination within plaster and masonry
- Timber condition where damp is present
- Evidence of leaks or penetrating damp
The goal is to establish the moisture source before recommending any treatment.
Repair & Replacement Options
The appropriate solution depends entirely on the diagnosis. Treating a failed DPC, a bridged DPC, and condensation as the same problem often leads to ineffective repairs.
| Treatment Option | Typical Use | Pros | Cons |
| Chemical DPC Injection | Existing DPC has failed or is absent in sections of masonry. | Less disruptive than structural work, widely available, suitable for many brick walls. | Success depends heavily on installation quality and wall condition. Often requires replastering. |
| Physical DPC Membrane Installation | Severe cases, major renovations, or where long-term structural solutions are required. | Creates a true physical barrier with long service life. | Highly disruptive, labour-intensive, and generally more expensive. |
| Replastering with Salt-Resistant Systems | Walls affected by salt contamination following damp treatment. | Removes contaminated plaster and helps restore finishes. | Does not solve the moisture source on its own. |
| Bridging Removal | Moisture bypassing an otherwise functional DPC. | Often resolves the problem without DPC replacement. | Requires identification of the exact bridging cause. |
Wish to Call a Professional?
When selecting a specialist, look for surveyors or contractors with relevant experience in building pathology and damp diagnosis.
Membership of organisations such as the Property Care Association (PCA) can indicate industry-recognised training and standards.
You can also connect with Damp2Dry Solutions for a survey. We use advanced methods, machinery, and techniques to identify if your DPC has failed or not.
FAQs
-
Does a failed Damp Proof Course always mean rising damp?
No. Low-level damp is often misdiagnosed as DPC failure. Condensation, penetrating damp, plumbing leaks, and a bridged damp proof course can all create similar symptoms. A professional survey is usually needed to identify the true moisture source.
-
How do I know it’s the DPC and not bridging or condensing?
Look for multiple signs together, such as tide marks, salt deposits, deteriorating plaster, and damaged skirting boards. Also check external ground levels and bridging defects. Condensation typically affects colder surfaces and upper walls rather than creating consistent low-level damp patterns.
-
Will a new DPC fix existing damage to plaster and skirting boards?
Not always. While a new DPC can stop moisture movement, damaged plaster and timber may still require separate repairs or replacement. Salt-contaminated plaster often needs replastering after the underlying damp problem has been successfully resolved.
-
Can I repair a failed DPC myself, or do I need a specialist?
Simple issues such as raised ground levels or bridging defects may be addressed by homeowners. However, diagnosing and repairing a failed damp proof course usually requires a specialist to identify the cause correctly and recommend the most suitable treatment.
-
Why do damp proof courses fail?
DPCs can fail due to age-related deterioration, damaged membranes, poor installation, or ineffective historic chemical treatments. In some cases, the DPC remains intact but moisture bypasses it through bridging caused by raised ground levels, render, or cavity debris.
-
How much does it cost to repair a failed damp proof course in the UK?
The blog does not provide a specific repair cost because costs vary significantly depending on the cause, wall condition, treatment method, property size, and whether additional work such as replastering or bridging removal is required.
-
Does Damp2Dry Solutions offer a survey for a failed damp proof course?
Yes. Damp2Dry Solutions offers damp surveys to determine whether a damp proof course has failed. Their team uses advanced equipment, methods, and diagnostic techniques to identify the source of moisture and recommend the appropriate solution.