

Damp in chimney breasts poses a significant challenge for homeowners, leading to issues such as mould growth, damage to interior decor, and even potential structural problems. When moisture accumulates around the chimney wall, it can result in visible water stains, peeling wallpaper, mould growth, damp patches on the ceiling, and an unpleasant musty odour.
In this guide, we’ll explore the signs, causes, and effective methods to address chimney breast dampness.
Signs of a Damp Patch on Chimney Breast
Here are some signs of a damp chimney breast
- Damp patches: Damp patches may appear on or around the chimney breast, especially during wet weather. In the meantime, a damp patch suddenly appeared on wall.
- Damp marks: Damp marks may appear on the chimney breast wall, usually in yellow or brown colour.
- Flaking paint: Flaking paintwork on the chimney breast may become more obvious during poor weather conditions.
- Moisture: Moisture may be present only around the fireplace and chimney breast.
- Musty odour: Moisture in the chimney can lead to a musty or damp odour.
- Condensation: Condensation can build up in and around the chimney. Hot, moist air settles on the cold surfaces of the chimney breast and turns into moisture. Warm, humid air gets trapped inside the chimney. This moisture condenses on the cooler surfaces of the chimney breast, leaving with damp chimney breast upstairs.
- Cracked masonry: A cracked or deteriorated crown allows water to infiltrate into the chimney. Brick and mortar crumble under the expanding water, leading to more extensive damage and potentially even leaks into the house.
- Leaning or tilting chimney: A leaning chimney indicates a lack of chimney maintenance as well as moisture intrusion.
Causes of the Dampness on Chimney Breast
Dampness does not appear overnight, it has been showing signs of its presence for the past few days. The only item we have not noticed on time.
When the chimney breast leaks.
Check the chimney stack for cracks, especially near the top and flashing. Look for crumbling or loose debris at the base. If you spot anything suspicious, it might be rainwater sneaking in. But don’t forget, unused chimneys can trap moisture too, so keep an eye out for other signs like dampness beyond the breast itself. Remember, professional help is always a safe step. Here are some ways you can detect chimney breast damp early, before it becomes a significant threat.
Check the chimney stack for cracks or damage
Inspect the entire stack from afar, looking for any irregularities in the brickwork or mortar. Cracks, regardless of size, are red flags. The top, crown, and flashing should receive special attention because they are the most susceptible to water damage. Spalling bricks and loose debris at the base are also suspicious signs
Inspect the surrounding area for leaks or moisture ingress points
Conduct a thorough visual inspection of the chimney stack and surrounding area. Give priority to the flashing, crown, and top, as these are typical entry points for water intrusion. Look for cracks in the brickwork, mortar gaps, spalling (crumbling) bricks, loose debris at the base, and any damage to the flashing. Remember, even small cracks can allow water to seep in and cause significant problems. If potential sources of ingress are identified, further investigation and potential repairs may be necessary.
Assess the ventilation in the room and around the chimney breast
Assess airflow, natural ventilation, air movement patterns, humidity levels, extractor fans, vents, and obstructions near the chimney breast. If concerns arise, investigate improvements like natural airflow, extractor fans, or addressing obstructions.
Building Faults Leading to Damp Chimney Breasts
Rain coming down the chimney causes dampness, and several building faults can also be culprits. Here are some key offenders:
- Cracks and Damage: Cracks, especially near the top or around flashing, allow water infiltration. Look for crumbling bricks, loose debris, or missing mortar.
- Leaking Flashing: Damaged or worn flashing around the chimney and roof joint allows water to leak in.
- Missing Chimney Cap: This leaves the chimney open to rainwater, snow, and debris, contributing to dampness.
These are a few of the factors that can lead to dampness on the chimney breast.
How to Dry Out a Wet Chimney?

A damp chimney can be a real headache, but with the right approach, you can dry it out and prevent future problems. Here’s a step-by-step guide to help you fix your damp chimney;
Determine the source of the dampness
Before you look for an alternative to dry dampness, it’s crucial to understand the cause of the dampness. Inspect the chimney stack for cracks, damaged flashing, missing caps, or blocked flues. Check for signs of rising dampness or hygroscopic salts. This will help you choose the most effective drying method.
Address the source
Once you know the culprit, address it directly. Repair cracks, replace damaged flashing, install a chimney cap, clear blockages, or seek professional help for rising damp or salt issues. This is vital to prevent further moisture ingress and ensure the drying process is effective.
Improve Ventilation
Good airflow is key to drying out a damp chimney. Open windows and doors to promote natural ventilation. Consider using a fan to direct air towards the chimney breast. If the chimney isn’t used, installing a ventilation grille can help prevent moisture buildup.
Remove Excess Moisture
Use absorbent materials like dehumidifiers, hygroscopic bags, or towels to remove excess moisture from the air and affected areas. Place them near the chimney breast and change them regularly.
Promote Drying
Increase air circulation around the chimney breast by removing furniture or objects that might block airflow. Use a fan to circulate dry air, and consider using a space heater to gently warm the area, aiding in evaporation.
Monitor and Repeat
Monitor the drying process regularly, checking for dampness and adjusting your approach as needed. Be patient, as drying a wet chimney can take time. Repeat steps 3-5 until the area is completely dry.
Prevent Future Dampness
Once the chimney is dry, take steps to prevent future problems. Ensure proper roof drainage, maintain the chimney stack and flashing, and continue to promote good ventilation in the room and around the chimney breast.
To repair and prevent future damp patches on the Chimney breast, it’s always advisable to call in experts for a damp survey. They will provide you with honest and perfect solutions to your dampness problems.
Damp Resolution in Chimney Area by US

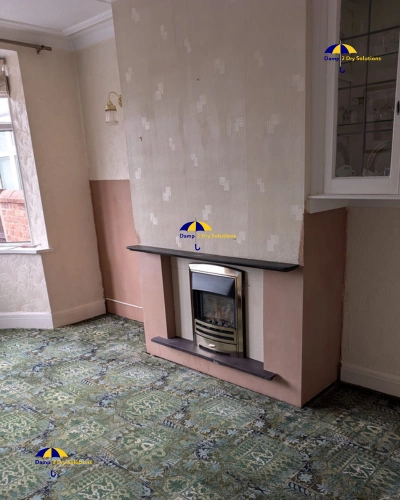
The client reported issues with damp patches around the chimney area, initially suspected to be due to water ingress. However, upon inspection, it was identified that the problem stemmed from salt residue within the old chimney flue.
This residue, a by-product of fuel combustion, manifested in soot-like black and white salts that absorbed moisture from the air, particularly during periods of high humidity, such as after rainfall.
These salts had permeated through the plasterboard, applied via dot and dab technique, exacerbating the appearance and spread of damp patches within the affected area.
So what needed to be done?
To address and resolve the damp issues caused by salt residue in the chimney flue, ensuring no future recurrence of the problem and eliminating any concerns over potential leaks or water ingress.

Here are the steps we undertake to resolve damp in the chimney area
- Initial Assessment: A comprehensive evaluation of the chimney area was conducted to confirm the presence of salt residue and assess the extent of damp penetration.
- Preparation: The area around the chimney was prepared for treatment. This involved removing furnishings, covering floors and nearby items with protective sheeting to prevent damage during the work process.
- Stripping Off Plasterboard: All affected plasterboard in the vicinity of the chimney was carefully removed to expose the underlying brickwork and salt-contaminated areas.
- Treatment of Brick/Salt Area: The exposed brick and salt deposits were thoroughly treated with a neutralising agent to counteract the salt residue’s hygroscopic properties.
- Installation of Plastic Membrane: A plastic membrane was installed over the treated brickwork to create a barrier that prevents any residual or future salt from coming into contact with the plasterboard.
- Refixing Plasterboard: New plasterboard was then securely fixed onto the treated and protected chimney area, ensuring a neat and professional finish.
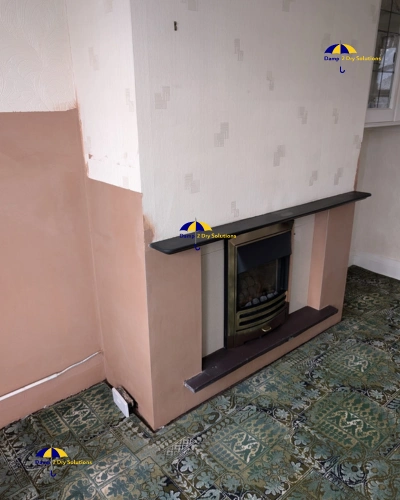
- Cleanup and Final Inspection: Following the completion of the plasterboard installation, the work area was cleaned, and all protective coverings were removed. A final inspection was conducted to ensure the quality and effectiveness of the work performed.
The chimney area has been successfully treated and protected against future damp issues caused by salt residue. The application of a neutralising agent, combined with the installation of a plastic membrane barrier, provides a long-term solution to the problem, ensuring the internal environment remains dry and healthy.
Discover unparalleled expertise with Damp 2 Dry Solutions Ltd, your go-to for affordable and premium damp chimney repair services. Trust in our dedicated team to deliver bespoke solutions that ensure your chimney is restored to its former glory, efficiently and cost-effectively.
Choose excellence, choose Damp 2 Dry Solutions Ltd for a damp-free, healthier home.